Building an Email Marketing Engine Part 4: API Endpoints & Database Enhancements
Learn how to extend your email marketing engine's database and create API endpoints for managing contacts. This in-depth guide covers every step from SQLite table creation to securing APIs.

Welcome back to our series on building an email marketing engine using Node.js, Express.js, SQLite, and SendGrid. In the previous parts, we set up our application, integrated it with SendGrid, and created a simple SQLite database to store our contacts. In Part 3, we introduced a custom login system with Auth0
In this article, we will be extending our database and creating API endpoints to upload and delete contacts. These enhancements will allow us to manage our contacts more effectively and provide a foundation for more complex operations in the future.
Extending our SQLite Database
SQLite is a great choice for our application due to its simplicity and ease of use. To start, we already created a Contacts table to store our contacts' information. Now, we're going to extend our database by introducing a subgroups table and a linking table called contact_subgroup.
Creating the subgroups Table
We want to be able to categorize our contacts into different subgroups for targeted marketing. To do this, we need a new table called subgroups. This table will have two columns:
id: A unique identifier for each subgroup.name: The name of the subgroup.
Here is the SQL statement to create the subgroups table:
CREATE TABLE subgroups (
   id INTEGER PRIMARY KEY AUTOINCREMENT,
   name TEXT
);
Creating the contact_subgroup Linking Table
Since a contact can belong to multiple subgroups and a subgroup can have multiple contacts, we have a many-to-many relationship between contacts and subgroups. To represent this relationship in SQLite, we need a linking table.
The ContactsSubgroups table has two columns:
contact_id: The ID of a contact, which is a foreign key referencingcontacts.id.subgroup_id: The ID of a subgroup, which is a foreign key referencingsubgroups.id.
Here's the SQL statement to create the contact_subgroup table:
CREATE TABLE contact_subgroup (
   contact_id INTEGER,
   subgroup_id INTEGER,
   PRIMARY KEY (contact_id, subgroup_id),
   FOREIGN KEY (contact_id) REFERENCES contacts (id),
   FOREIGN KEY (subgroup_id) REFERENCES subgroups (id)
);
Now, we have a much more flexible system for categorizing our contacts. We can assign a contact to multiple subgroups and select contacts based on their assigned subgroup.
Zero config cloud made for developers
From GitHub to deployment in under 5 seconds.
Review Faster by spawning fast Preview Environments for every Pull Request.
AB Test anything from individual components to entire user experiences.
Scale globally as easy as you would with serverless but without all the limitations.
Implementing API Endpoints
With our database now ready, we need a way to interact with it. That's where our API endpoints come in. We will create two endpoints: one for adding a contact and one for deleting a contact.
The addContact Endpoint
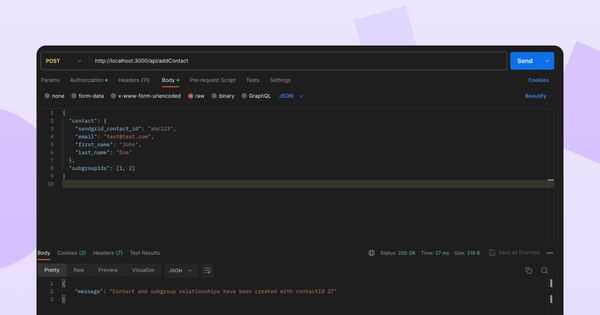
The addContact endpoint will receive a POST request with the contact's details in the request body. These details include the contact's email, first name, last name, and optionally, the ID of the subgroup that the contact belongs to.
For this, we create a new file called dataToDb.js where we define the addContact function:
function addContact(req, res) {
    // Check if the contact object is provided in the request body
    if (!req.body || !req.body.contact) {
        return res.status(400).json({ error: 'Contact data is missing in the request body.' });
    }

    // Deconstruct the contact and subgroupIds from the request body
    const { contact, subgroupIds } = req.body;

    // Validate the contact object
    const { sendgrid_contact_id, email, first_name, last_name } = contact;
    if (!sendgrid_contact_id || !email || !first_name || !last_name) {
        return res.status(400).json({ error: 'Some contact properties are missing.' });
    }

    // Open a connection to the database
    let db = new sqlite3.Database('./server/data/contacts.db', sqlite3.OPEN_READWRITE);

    // Prepare the SQL for inserting the contact
    let sql = 'INSERT INTO contacts (sendgrid_contact_id, email, first_name, last_name) VALUES (?, ?, ?, ?)';

    // Run the SQL query
    db.run(sql, [sendgrid_contact_id, email, first_name, last_name], function (err) {
        if (err) {
            return res.status(500).json({ error: err.message });
        }

        const contactId = this.lastID;

        // If subgroupIds were provided, associate the contact with each subgroup
        if (subgroupIds && Array.isArray(subgroupIds)) {
            const subgroupSql = 'INSERT INTO contact_subgroup (contact_id, subgroup_id) VALUES (?, ?)';

            // Iterate over each subgroupId
            subgroupIds.forEach(subgroupId => {
                db.run(subgroupSql, [contactId, subgroupId], function (err) {
                    if (err) {
                        return res.status(500).json({ error: err.message });
                    }
                });
            });

            // Respond with a success message
            res.json({ message: `Contact and subgroup relationships have been created with contactId ${contactId}` });
        } else {
            // Respond with a success message
            res.json({ message: `Contact has been inserted with rowid ${contactId}` });
        }
    });

    // Close the database connection
    db.close((err) => {
        if (err) {
            console.error(err.message);
        }
    });
}
Upon receiving a request, the addContact function validates the provided data, extracts essential information, and connects to the database. It then prepares an SQL query to insert the contact details into the contacts table. If successful, it obtains the contactId of the new contact and, if applicable, associates the contact with provided subgroups in the contact_subgroup table. It responds with appropriate success messages, and it closes the database connection after the operations are completed.
The deleteContact Endpoint
The deleteContact endpoint receives a DELETE request with the ID of the contact to delete in the URL. It deletes the contact from the Contacts table and also removes any links between the contact and subgroups in the ContactsSubgroups table.
Here's how the deleteContact function looks in our dataToDb.js file:
function deleteContact(req, res) {
    const contactId = req.params.contactId;

    if (!contactId) {
        return res.status(400).json({ error: 'Contact id is required.' });
    }

    let db = new sqlite3.Database('./server/data/contacts.db', sqlite3.OPEN_READWRITE);

    // Prepare the SQL for deleting the contact
    let sql = 'DELETE FROM contacts WHERE id = ?';

    // Run the SQL query
    db.run(sql, [contactId], function (err) {
        if (err) {
            return res.status(500).json({ error: err.message });
        }

        // Respond with a success message
        res.json({ message: `Contact with id ${contactId} has been deleted` });
    });

    // Close the database connection
    db.close((err) => {
        if (err) {
            console.error(err.message);
        }
    });
}
The deleteContact expects the contactId as a parameter in the request. If the contactId is missing, it responds with an error. Otherwise, it connects to the contacts.db database, prepares an SQL query to delete the specified contact from the contacts table, and executes the query. If successful, it responds with a success message.
Protecting API Endpoints with an API Key
Security is a crucial aspect of any web application. For our API endpoints, we'll use a simple but effective method of protection: an API key. An API key is a secret token that a client must send in their request to access our endpoints.
We'll define a middleware function, apiKeyMiddleware, that checks if the incoming request includes a valid API key. This middleware will be used in our addContact and deleteContact routes.
Here's the middleware definition in our main server file:
const API_KEY = 'api-key';
const apiKeyMiddleware = (req, res, next) => {
  const reqKey = req.get('x-api-key');
  if (reqKey && reqKey === API_KEY) {
    next();
  } else {
    res.status(403).json({error: "Invalid or missing API key"});
  }
};
We then use this middleware in our routes as follows:
apiRouter.post('/addContact', apiKeyMiddleware, addContact);
apiRouter.delete('/deleteContact/:contactId', apiKeyMiddleware, deleteContact);
With this setup, only requests that include the correct API key in the x-api-key header will be able to access the addContact and deleteContact endpoints.
Adjusting the Server Setup
In our previous setup, we had all our routes handled directly by our main app object. We also didn't differentiate between different types of routes, like those for our API versus our application.
However, as we move forward, our application grows and we need to separate these concerns. We don't want to apply the same set of rules to all routes. For example, we want to secure our API with an API key and our application with Auth0. To achieve this, we introduce two new routers, apiRouter and appRouter, using express.Router().
const apiRouter = express.Router();
const appRouter = express.Router();
Routers are like mini Express applications that only have middleware and routing methods. We use the apiRouter to handle all our API routes and appRouter to handle application routes.
We then apply the API key middleware only to the apiRouter and Auth0 middleware to the appRouter:
apiRouter.post('/addContact', apiKeyMiddleware, addContact);
apiRouter.delete('/deleteContact/:contactId', apiKeyMiddleware, deleteContact);
...
appRouter.use(auth(auth0Config));
...
appRouter.post("/contacts", requiresAuth(), async (req, res) => {...});
appRouter.post('/upload', requiresAuth(), upload.single('contacts-upload'), (req, res) => {...});
appRouter.get('/profile', requiresAuth(), (req, res) => {...});
Now, the different routers are applied to different sets of routes. We use them in our main app like so:
app.use('/api', apiRouter);
app.use('/', appRouter);
This way, any request to the /api endpoint will go through the apiRouter and will be checked for the API key. Any other request will be handled by the appRouter, which is secured by Auth0.
With these changes, our application is not only more organized, but it also handles different types of requests with different security requirements. This allows us to better control access to our resources and provides a more secure and efficient system.
Wrapping Up
In this article, we extended our database and created API endpoints for adding and deleting contacts. We also went over how to handle many-to-many relationships in SQLite. With these enhancements, our email marketing engine is becoming more powerful and flexible.
In the next part of this series, we will be looking at how to send emails to specific subgroups and fixing up the frontend. Stay tuned!
As always, you can take a look at the latest status of the Email Marketing Engine in our GitHub Repo. To host the application yourself, just use our magic Codesphere link to get you started in only a few clicks!

