Automation Sequence with BullMQ (Email Engine Pt.5)
Delve into the intricacies of automating email sending using SQLite & BullMQ in our latest installment. Learn how to structure, schedule, and send custom delayed emails.

Introduction
Welcome back to our "Building an Email Marketing Engine" series where we create a Node.js Application using Express.js, SQLite, SendGrid API and now BullMQ to create an email marketing engine to bypass pricey email marketing providers.
In our previous parts, we went about setting up the application, integrate it with SendGrid, creating a simple SQLite DB to store our contacts, create a login system using Auth0 and created Endpoints to add contacts to our db using external services.
Working with BulMQ
In this part of our series, we will work on the trickiest part so far: automating email sending with custom scheduled jobs. We will go into how BullMQ works and implement the server side handling of these jobs in our application to allow for automated email sequences.
This will be achieved by expanding the capabilities of our SQLite DB and implementing BullMQ for scheduling and handling emails.
If you're primarily interested in learning about BullMQ, you can skip ahead.
As always, you can check the GitHub Repo for the latest status of our development.
Let's get to it!
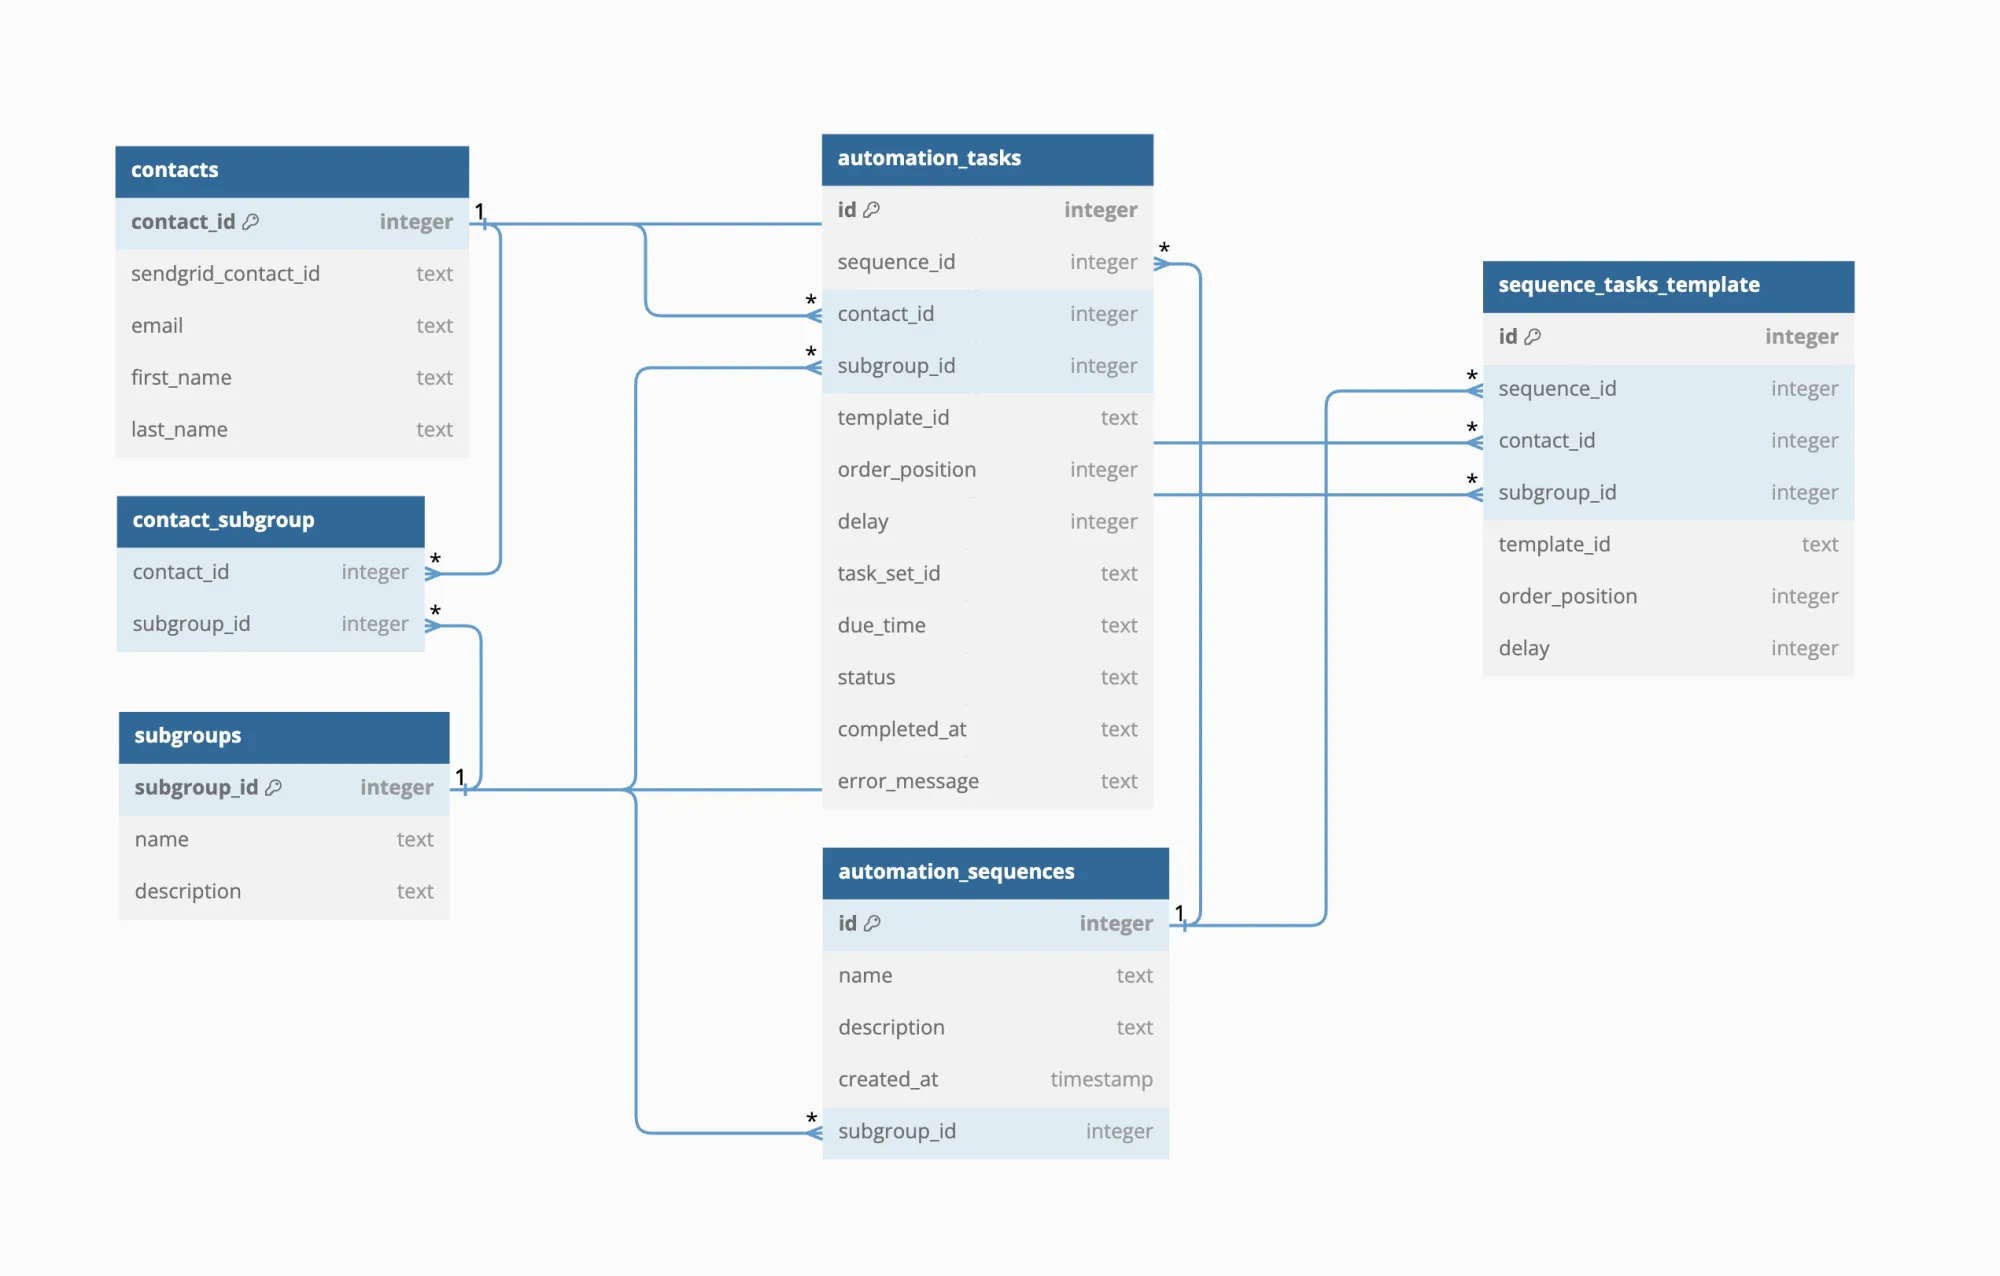
Creating necessary tables
To acommodate automation, I firstly had to adjust our existing database structure. The goal was to create 3 new tables that would house the schedules jobs, sequences and templates for those sequences.
The logic here is as follows:
Automation Sequences
Automation Sequences are the highest level of our automation system. They store the name and the description of a sequence and are defined by the user.
Sequence Task Templates
Sequence Task Templates house the basic task information needed for a specific template. For an onboarding flow that might be 3 different emails being sent to the user over 3 days after signing up.
Automation Tasks
Automation Tasks are the actual jobs that are being scheduled and executed on the server side with BullMQ. They extend the template with a few more columns, including the status, the due time or a task set id. The task set id is particularly important, as it allows assigning tasks to a specific launched sequence. Staying in the example of an onboarding flow, each user would have 3 tasks (emails to be sent using BullMQ) and all of them would have the same set id.
Handling Storage of Tasks in SQLite
I started creating the logic for storing tasks in SQLite after I created those new tables. Templates and their according tasks are created by the user. This will be implemented in an engaging way when we start working on the client side code, specifically the frontend.
The two main functions that handle the automation in the SQLite db are:
createTasksFromSeqIdsendTasks
Both of those make use of a number of helper functions I wrote beforehand. Most of them are very simple and do things like getting a specific task from the automation_tasks table or creating a unique id for task sets.
async function getSequenceTemplateBySeqId(sequenceId) {
  const db = await getDatabaseConnection();

  const sql = `SELECT * FROM sequence_tasks_template WHERE sequence_id = ?`;

  return new Promise((resolve, reject) => {
    db.all(sql, [sequenceId], (err, rows) => {
      if (err) {
        reject(err);
      } else {
        resolve(rows);
      }
    });
  });
}
To see all helper functions, take a look at the GitHub Repo, where you will find all of them in the utils.js file.
The createTasksFromSeqId function
This async function takes in two parameters: sequenceId and contactId.
The function generates a unique taskSetId , then tries to fetch a sequence template using the sequenceId. If successful, it sorts the sequence template based on the order_position property.
Next, it iterates through each task in the sequence template. For the first task, it sets the dueTime to the current date and the status to "pending". For subsequent tasks, it sets the dueTime to null and the status to "unscheduled".
Then, it calls a function called createAutomationTask passing in various parameters including the taskSetId, dueTime, and status for each task.
Finally, the function returns the taskSetId.
async function createTasksFromSeqId(sequenceId, contactId) {
    const taskSetId = generateTaskSetId();

    let sequenceTemplate;
    try {
        sequenceTemplate = await getSequenceTemplateBySeqId(sequenceId);
        sequenceTemplate.sort((a, b) => a.order_position - b.order_position);
    } catch (error) {
        console.error("Error fetching sequence template:", error);
    }

    for (let i = 0; i < sequenceTemplate.length; i++) {
        const task = sequenceTemplate[i];
        let dueTime;
        let status;

        if (i === 0) {
            // The first task
            dueTime = new Date(); // Set to "now"
            status = "pending";
        } else {
            dueTime = null; // Or whatever placeholder you want to use to indicate it's not scheduled yet
            status = "unscheduled";
        }

        await createAutomationTask(
            task.sequence_id,
            contactId,
            task.subgroup_id,
            task.template_id,
            task.order_position,
            task.delay,
            taskSetId,
            dueTime,
            status
        );
    }

    return taskSetId;
}
The sendTasks function
This is where the actual automation happens and tasks are being scheduled and sent to the BullMQ queue.
The sendTasks function is an async function too, that sends tasks to a specified task set. It is used to be called after the createTasksFromSeqId function, using the returned taskSetId.
It retrieves scheduled tasks for the given task set ID, sorts them based on their order position, and then iterates over each task.
For each task, it checks if the task's status is "pending" and if its due time has passed. If so, it retrieves the contact data for the task's associated contact ID and sends an email to the contact using a specified SendGrid template ID.
It then marks the task as completed in our SQL database. If there is a next task that is unscheduled, it schedules the next task based on the completed task's information and a delay. Finally, it breaks the loop after processing the first task that meets the conditions. If any errors occur during the process, they are logged to the console.
async function sendTasks(taskSetId) {
  try {
    const scheduledTasks = await getScheduledTasksBySetId(taskSetId);
    scheduledTasks.sort((a, b) => a.order_position - b.order_position);

    for (let i = 0; i < scheduledTasks.length; i++) {
      const currentTask = scheduledTasks[i];

      if (currentTask.status === "pending" && currentTask.due_time <= Date.now()) {
        const contactData = await getContactById(currentTask.contact_id);

        try {
          console.log("Sending email to:", contactData[0].email);
          await sendSingleEmail(contactData[0].email, currentTask.template_id);
          await completeTask(currentTask.id, Date.now());
          console.log("Task completed in SQL db");
        } catch (error) {
          console.error("Error sending email:", error);
          continue;
        }

        const nextTask = scheduledTasks[i + 1];
        if (nextTask && nextTask.status === "unscheduled") {
          const completedTask = await getTaskById(currentTask.id);
          const updatedTask = await scheduleNextTask(completedTask, nextTask);
          const scheduledTaskData = {
            sequence_id: updatedTask.sequence_id,
            contact_id: updatedTask.contact_id,
            subgroup_id: updatedTask.subgroup_id,
            template_id: updatedTask.template_id,
            order_position: updatedTask.order_position,
            delay: updatedTask.delay,
            task_set_id: updatedTask.task_set_id,
            dueTime: updatedTask.due_time,
            status: updatedTask.status
          };

          const delay = nextTask.delay * 1000;
          await scheduleBullTask(scheduledTaskData, delay);
        }

        break;
      }
    }
  } catch (error) {
    console.error("Error fetching scheduled tasks:", error);
  }
}
As you can see, if a nextTask that is unscheduled is found, its status is then set to "pending" by the scheduleNextTask helper function and its being scheduled and added to the bull queue using scheduleBullTask .
async function scheduleNextTask(lastCompletedTask, currentTask) {
  if (!lastCompletedTask || !lastCompletedTask.completed_at) {
    return { dueTime: new Date().toISOString(), status: "pending" };
  }

  const lastCompletedAtTimestamp = parseInt(lastCompletedTask.completed_at, 10);
  const lastCompletedAt = new Date(lastCompletedAtTimestamp);
  const delayDuration = currentTask.delay * 1000;
  const dueTime = new Date(lastCompletedAt.getTime() + delayDuration);
  const status = "pending";

  const db = await getDatabaseConnection();

  const sql = `UPDATE automation_tasks SET due_time = ?, status = ? WHERE id = ?`;

  return new Promise((resolve, reject) => {
    db.run(sql, [dueTime.getTime(), status, currentTask.id], (err) => {
      if (err) {
        reject(err);
      } else {
        // Fetch the updated row data
        const fetchSql = `SELECT * FROM automation_tasks WHERE id = ?`;
        db.get(fetchSql, [currentTask.id], (fetchErr, row) => {
          if (fetchErr) {
            reject(fetchErr);
          } else {
            resolve(row);
          }
        });
      }
    });
  });
}
Using BullMQ to automate sending of scheduled jobs
BullMQ is an advanced server side Node.js queue and job service solution built on top of the Redis database. With BullMQ, you can manage jobs in various states (waiting, active, delayed, etc.), set job priorities, schedule recurrent jobs, and handle delayed jobs.
This is incredibly useful for our case, since it's meant for big applications and still very easy to handle.
A Bull queue essentially consists of 3 different parts:
- Producers: They produce a specific job and add it to the queue
- Job Queue: This is where the actual jobs are saved, it is housed in a Redis database
- Consumers/Workers: They take care of handling the jobs in the job queue
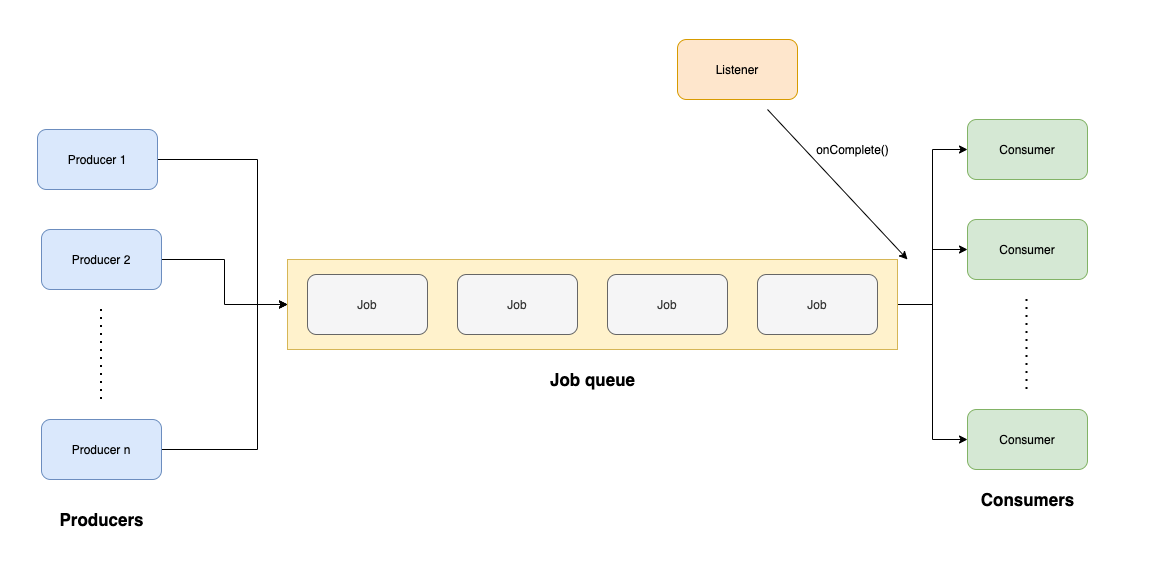
Let's break down, how those different mechanism will come to play in an application like our email marketing engine.
Initialization and Producer
Firstly, we need to initialize the Queue and give it a name. Producers are essentially just custom functions that are executed on the server side. In our case it is defined as a regular asynchronous function called scheduleBullTask that schedules a new task to be executed later. It adds a job to a task queue with some task data and a specified delay.
The delay is defined in the sendTasks when scheduleBullTask is called. It is retreived from the SQLite database. This is the reason why (for now) we use SQLite for storing the tasks while using BullMQs Redit database to store scheduled tasks. We want to make sure that scheduled jobs are only added t0 the job queue once the previous job been executed. This might be subject to change.
const { Queue } = require('bullmq');

//initialize new Queue
const taskQueue = new Queue("taskQueue", {
    connection: {
        host: "127.0.0.1",
        port: 6379
    }
});

//Producer: New Task is scheduled
async function scheduleBullTask(taskData, delay) {
    await taskQueue.add('myJobName', {
        sequence_id: taskData.sequence_id,
        contact_id: taskData.contact_id,
        subgroup_id: taskData.subgroup_id,
        template_id: taskData.template_id,
        order_position: taskData.order_position,
        delay: taskData.delay,
        task_set_id: taskData.task_set_id,
        dueTime: taskData.dueTime,
        status: taskData.status
    },
        {
            delay: delay
        });
}


module.exports = {
    scheduleBullTask
}
You can see that the syntax for adding a job to the job queue is fairly simple using the .add method provided by BullMQ. A scheduled job is essentially just data stores to BullMQs Redis database and in of itself doesn't do anything. It is when the workers come in that define how a task is to be handled.
Worker
Just like Producers, Workers are simply functions that interact with the queue to some extend.
Our worker defines, that once a task is ready to be executed, it accesses the job data (which houses the task information from our SQLite DB) and executes the sendTasks function which then sends the task and schedules the next one (if it exists), in turn creating a new job queue entry. This happens until all tasks are set to "completed" in the SQLite database, which is when no more jobs are added to the queue.
const { Worker } = require('bullmq');

const { sendTasks } = require("../automationJobs")

//Initialize Worker for handling
const taskProcessorWorker = new Worker("taskQueue", async (job) => {
    const taskData = job.data;

    await sendTasks(taskData.task_set_id);

    console.log("sent email for task with task_set_id:", taskData.task_set_id);

    //mark the job as completed
    return {
        id: taskData.id,
        sequence_id: taskData.sequence_id,
        status: "completed"
    };
}, {
    connection: {
        host: "127.0.0.1",
        port: 6379
    }
})

taskProcessorWorker.on('completed', (job) => {
    console.log(`Job ${job.id}  Completed`);
})

taskProcessorWorker.on('failed', (job, err) => {
    console.error(`Job ${job.id} failed with error ${err.message}`);
});
Essentially, the worker is assigned to the existing queue (taskQueue). To add some additional logging, I used the .on method to log whether a task was completed successfully or not.
Creating an endpoint for automation
To make use of our newly created automation flow, I created a new endpoint which allows for external services to send a request, add a user to the database and start the automation flow.
For this, I made use of the addContact function we created in our last installment with some slight tweaks.
apiRouter.post("/addContactOnboarding", apiKeyMiddleware, async (req, res) => {
  try {
      const contactId = await addContact(req);
      console.log("contactId",contactId);
      const taskSetId = await createTasksFromSeqId(1, contactId);
      sendTasks(taskSetId);
      res.json({ message: `Onboarding flow started with taskSetId: ${taskSetId}` });
  } catch (error) {
      console.error(error);
      res.status(500).json({ error: error.message });
  }
});
This allows for us to send a POST request to the defined endpoint with body that includes some information about the new contact and then automatically start the onboarding flow.
{
  "contact": {
    "sendgrid_contact_id": "",
    "email": "max@mustermann.com",
    "first_name": "Max",
    "last_name": "Mustermann"
  },
  "subgroupIds": [1, 2]
}
Wrapping up
In this installment, we've successfully navigated the complexities of automating email sending using SQLite and BullMQ. By restructuring our database and leveraging BullMQ's capabilities for scheduling tasks, we've built a robust system that schedules and sends custom delayed emails efficiently. With the addition of a new endpoint, integrating external services and automating the onboarding flow is now seamless. As we continue to refine and enhance our email marketing engine, we will iterate on this, optimizing it even further.
Also, we're coming closer towards creating a frontend for our app!
As always, you can take a look at the latest status of the Email Marketing Engine in our GitHub Repo. To host the application yourself, just use our magic Codesphere link to get you started in only a few clicks!
