Getting Started with Jamstack
Over the past couple of years, one tech stack that has consistently stood out from the crowd in developer conversations is Jamstack. In…


Table of Contents
Over the past couple of years, one tech stack that has consistently stood out from the crowd in developer conversations is Jamstack. In this article, we’re going to go over what makes Jamstack so unique, as well as how you can get started creating your own Jamstack web app.
Let’s get right into it!
What is Jamstack?
Jamstack is an architecture designed to make your web app faster, more secure, and easier to scale. Many people believe Jamstack is the next evolution in modern web development — and here’s why.
Jamstack is arguably the lightest technical stack out there. It eliminates the need to worry about infrastructure and servers, as it requires no real interaction with a database and relies mostly on third-party APIs in order to provide additional functionality, such as authentication and payment.
A Jamstack app consists of static HTML pages, made dynamic using JavaScript and enhanced with third-party services via API and prebuilt Markup. That’s where its name comes from JavaScript, API, and hypertext Markup.
How Does Jamstack Work?
Though JAMstack confusingly includes the word “stack”, it is more of architecture for web applications that promise to be faster, cheaper, and more secure than the traditional model. The traditional model is the client-server model, where applications are served dynamically from a web server.
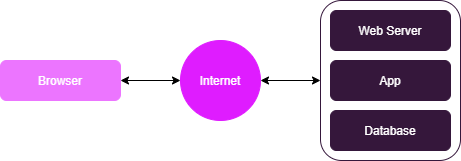
The key concept behind Jamstack is to eliminate the need for a backend server for the app, at least in the form with which you may be accustomed.
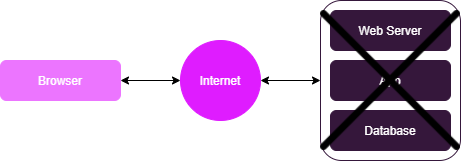
Instead, Jamstack sites are simply static files that are served by a special type of file-hosting called a CDN (Content Delivery Network). A CDN is actually a network of file servers around the world, all holding a copy of your site’s files.
Once your static site has been loaded by a browser, you can use JavaScript to generate HTTP requests to third-party services, including databases, search, identity management, payment processing, and serverless functions.
Jamstack Benefits
So what are the benefits of Jamstack? Why go through the hassle of transforming your web app architecture?
Jamstack’s architecture is faster, cheaper, and more secure, which is made possible by the usage of a CDN and the elimination of a web server.
- A CDN is generally faster than a webserver!
Since a CDN does not process requests and instead just serves files, the request/response loop is much shorter. And since CDNs can serve on the network edge, closer to the user, the latency of the response is minimized.
2. A CDN is most likely less expensive than a webserver!
If you use a web server, it must run 24/7 listening for requests. Since cloud computing is charged by the minute, you’ll be paying for your server, even when it’s idle.
CDN hosting is generally less expensive because a CDN service is only charged by the volume of data served, and therefore its idle time doesn’t cost anything.
3. A CDN is generally more secure than a webserver!
Finally, unlike a web server, a CDN does not process requests and therefore has limited potentially exposed attack vectors for hackers. A Jamstack site will still connect to services, such as cloud databases, but since these are managed by specialist third parties, security gaps are usually minimal.
How Do I Get Started using Jamstack?
Building the Frontend
Let’s start with the Jamstack frontend. While the core of a Jamstack website is the static HTML that’s delivered to the browser, JavaScript and the UI frameworks that build that experience are what have made its architecture popular.
A common front-end framework for Jamstack is Next.js. The following demonstrates how to get started with Next.js for Jamstack development. The easiest way to get started is by typing the following command in your terminal, and I’ll name the project mynextapp:
$ npx create next-app mynextapp
which will generate for us a default boilerplate page.
Navigate into the newly made directory we just created by opening the folder in your code editor or by typing in the terminal:
$ cd mynextapp
$ code .
The following is an example of the default starter Next.js file tree, generated by the create-next-app command:
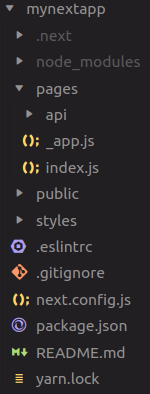
- The node_modules folder is where all the dependencies are stored.
- The pages folder is where we keep all of our page components. The idea is that each page in Next.js has its own React component. At the moment, the only component we have is the index.js component, which will be for the homepage.
- The api folder is for API endpoints.
- The
app.jsfile acts as the root component, and all of our different page components are rendered here:

- The
publicfolder is where all of our public assets are stored, such as images. - The
stylesfolder contains all of our CSS files and CSS modules. .gitignoreis for version control.package.jsonis to keep track of our various dependencies.
In the package.json file, we have the devscript, which spins up a local development server for us, to enable us to preview our app in the browser.
In the terminal, run the following command:
$ npm run dev
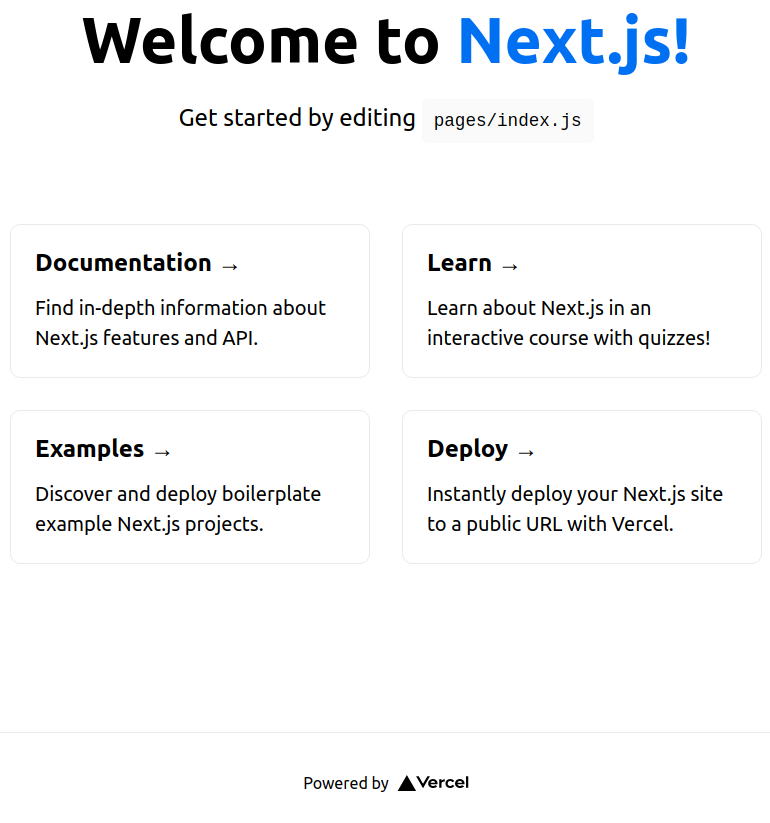
In your browser, type localhost:3000, and the following will be displayed:
The content shown in your browser is defined in the index.js component. Replace all the content inside the main <div> with a simple heading:
Now, we can see our new content displayed in the browser:

The index.js component is being pre-rendered before it even reaches the browser. During development, this is done via server-side rendering. The server renders the component, then sends the HTML file to the browser, which happens on each page request from the browser.
Pages and Routes
The pages folder is where we create all of our page components. Each page in Next.js is driven by a React component. So for an About page, we’d have an About component, for a Pricing page, we’d have a Pricing component, and so on. Each page component has its own file inside the pages folder. Therefore, the file name and location of each component are tied to the route for that particular page.
For example, in the pages folder, let’s create an about.js file. Next.js will automatically create a route /about, which is the name of the file, to serve up this component. The route name is tied to the file name.
The one exception to the rule is index.js. Next.js doesn’t create a route /index, it just creates the route /. So all we have to do is go to the root of the domain to see the index.js component.
In the about.js file, let’s create a stateless functional component and export it:
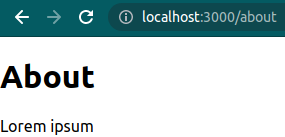
Go to /about in the browser to see the About component page:
We can also create subfolders in the pages folder that contain page components.
Let’s create a subfolder called pricing and a file called plan1.js. In the plan1.js file, we’ll create a stateless functional component called Plan1:
When we have a subfolder, Next.js will create a route according to the subfolder as well. Therefore, in this case, the route is: localhost:3000/pricing/plan1
And that’s how easy it is to make a multi-page website with Next.js.
Building the Backend
Content is at the heart of any website or application. This may take a variety of forms, such as a blog or an online store. Tools like Auth0 provide user authentication and management, which can present a number of challenges on its own.
There are additionally a number of cloud projects that make it simple to build serverless functions, from which you can begin developing your own backend service.
The great thing about Jamstack apps is that they serve as a central point for bringing in any feature or service you require, paving the way for powerful solutions that are focused on addressing your specific challenge.
Deploying Your App
Deploying a website and managing CI/CD systems is arguably one of the most difficult aspects of developing a web application.
In the Jamstack world, tools such as Codesphere offer automated DevOps to make deployment easier.
What Now?
Given the advantages of Jamstack, many people in technology are expecting Jamstack’s popularity to increase. Jamstack is growing rapidly, and may one day become the most popular architecture on the web.
If you want to have a go at building your own Jamstack app or a solution to the painful CI/DC system management, go to Codesphere which provides an online code editor in which you can build, test, and deploy your apps all within a single tab of your browser.
Thanks for reading!
