How to Build a Stock Trading Bot with Python
In this tutorial, we’re going to be using Python to build our own trading bot.
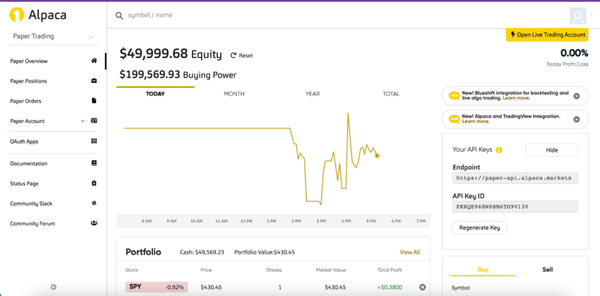
Table of Contents
Earlier this week, we explored how code has drastically changed financial markets through the use of autonomous trading algorithms. Surprisingly, building your own trading bot is actually not that difficult!
In this tutorial, we’re going to be using Python to build our own trading bot.
Keep in mind that this tutorial is not about how to make billions off of your trading bot. If I had an algorithm that sophisticated I probably wouldn’t be giving it away. Rather, I’m going to show you how you can read market data, buy and sell stocks, and program the logic of your trading algorithm, all with some relatively simple Python code.
And of course:
This article is for information purposes only. It is not intended to be investment advice. Seek a duly licensed professional for investment advice.
You can open up a quick demo of the project on Codesphere here:
https://codesphere.com/#https://github.com/LiorB-D/TradingBot
However, you will need an API key before you can actually start trading with our bot — More on that later.
Some Helpful Terms
Before we get started, it’ll be helpful to define a couple of terms:
- Paper Trading: The trading of securities with fake money for educational or testing purposes.
- Backtesting: Testing a trading algorithm against past market data in order to evaluate its effectiveness.
- Moving Average: The average of a certain amount of recent entries in a set of data.
- S&P 500: A stock market index composed of the 500 largest companies listed on US stock exchanges
- Closing Price: The final price of a security during a unit of time
- Good ’Til Cancel (GTC): When you place a trade, it may not be met right away. A broker will continue to try and execute a GTC trade until you cancel it.
Setup
The trading API we’re going to be using is called Alpaca and is by far one of the most intuitive trading APIs I’ve found.
In its free tier, Alpaca includes both Paper and Real Trading and both Historical and Live market data. It also has an incredibly clean user interface and Python library.
In addition, unless you’re willing to leave your python script running on your computer, you’re going to need to deploy your trading bot in the cloud. For this, we’re going to use Codesphere:
Since Codesphere’s front-end is an IDE, we can develop our bot directly on the platform. If you wish to do the coding on your local machine, however, you can connect your GitHub repo to Codesphere and deploy afterward.
The only environment setup we really need before we can start coding is to create our pip environment:
pipenv shell
And then install the Alpaca API
pipenv install alpaca_trade_api
We are also going to need to make a free Alpaca account and then navigate to our Paper Trading Account.
Notice your API Key on the right-hand side. When you first open your account, you will be prompted to generate a key and both public and private keys will be shown to you. We’re going to need those for later.
Buying and Selling Stocks
We can then set up our Alpaca Trading library and buy and sell stocks in Python like so:
Our Strategy
The strategy we’re going to use is to buy and sell whenever the 5 minute moving average crosses our price. Now, this is FAR from a good trading strategy, but the logic is relatively simple and will allow us to focus on the general structure of a trading bot.
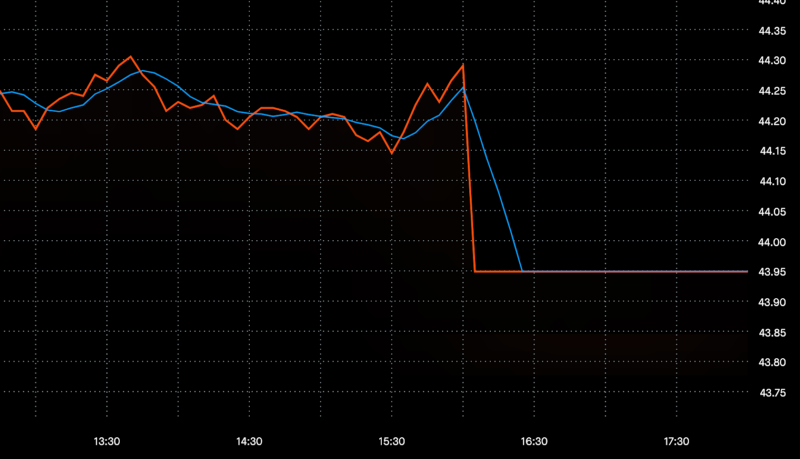
In the above example, the red line is the stock price and the blue line is the moving average. When the moving average crosses under our price, we are going to buy a share of our stock. We are then going to hold the stock until the moving average crosses again and goes above the price. When that happens we are going to sell our share, and then wait for the next buying signal.
In this article, we’ll be trading SPY, which is an index that tracks the S&P 500, and we will only be trading one stock at a time.
Keep in mind that if you were to make these trades with real money, you would have to comply with day trading regulations and brokerage fees, which would likely offset your gains.
Reading Market Data
Now let’s go over how to read market data using the Alpaca API in Python:
If you’re looking for more in-depth information for when you build your strategy, check out Alpaca’s documentation:
https://alpaca.markets/docs/api-documentation/api-v2/market-data/alpaca-data-api-v2/
Executing Our Strategy
Now let’s finally put all of this together for our complete trading algorithm:
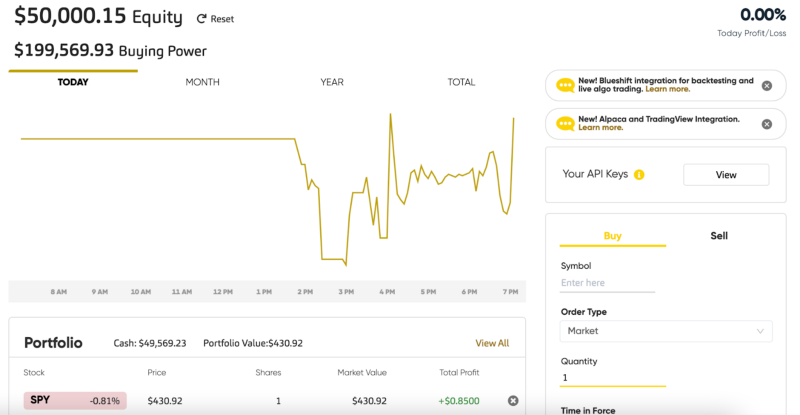
And there we have it! We just built a trading bot in 54 lines of code! Now if we leave this running on Codesphere throughout the day, we should see our Alpaca dashboard update throughout the day:
Backtesting a Strategy
Now if you don’t want to wait around to see if your algorithm is any good, we can use Alpaca’s market data API to backtest our Python algorithm against historical data:
Next Steps
So there you have it, we just created a rudimentary trading bot with some fairly simple Python!
Here is the full repo:
https://github.com/LiorB-D/TradingBot
While I highly encourage you guys to play around with the Alpaca API for educational purposes, be extremely careful if you are going to trade real securities. One bug in your code could have disastrous effects on your bank account.
On a lighter note, this is a great opportunity to put those statistics classes you took to work.
Comment down below if you’re going to build your own trading algorithm!
Happy Coding from your folks at Codesphere, the next-generation cloud provider.

