Introduction to Server Side tracking
Utm parameters will be blocked in Apple's Safari browser later this year. Server side tracking helps to maintain reliable tracking.

Table of Contents
On June 5 Apple announced that it will start to limit the usability of utm-tracking parameters in their safari browsers starting Q4 2023 due to privacy concerns. Other industry leaders like Google and Firefox are expected to follow closely. Among online marketers this has caused quite some turmoil as it questions their ability to continue with business-as-usual tracking solutions.
Client side tracking has been under increasing pressure for a while now. The GDPR implementation, stricter cookie laws around the world, ad-blocker and anti tracking add-ons on an all-time high and now big tech is starting to block it themselves.
For online marketing professionals client side tracking has some advantages, for instance setting it up in the basic version is straightforward. Often all you need to do is to add a script tag to your header and one of the gazillion, cheap and well integrated managed solutions takes care of the rest for you. The range of events that can be tracked (i.e. scrolling, page leaves etc.) is extensive and the browser (=client) has a lot of context available, this includes things like utm parameters, cookies and ip addresses.
Clientside vs. serverside tracking

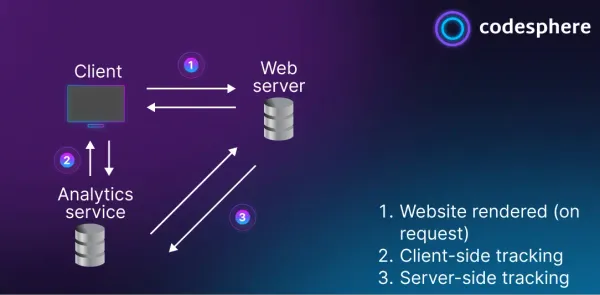
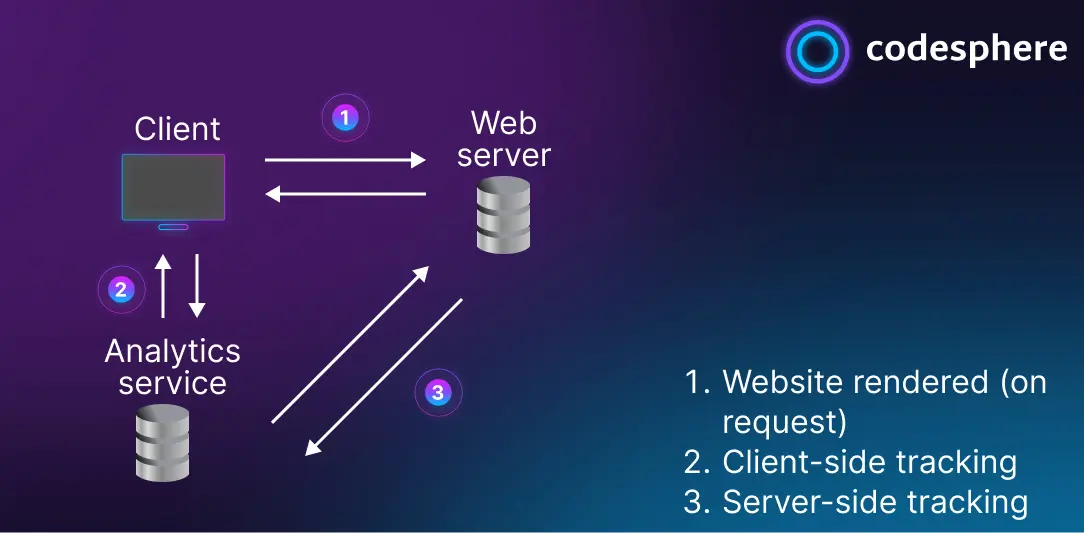
Whenever users visit your website their client (usually a browser or mobile device) requests the website and its resources from the web server (Case 1). That happens regardless of the tracking choice. The difference is for client side tracking (Case 2) the users events are processed from the client and sent to some analytics service directly.
For server side tracking (Case 3) we need to infer the users events from the requests to the server and data attached to these requests. If we want any context beyond the typical request data (like pages loaded, forms submitted etc.) we need additional client side logic that attaches data to requests.
The main advantage of server-side tracking is that it’s independent of cookie preferences, ad-blocks and therefore more reliable. It is however not quite as simple to set up as client side tracking. It’s a larger transformation regardless of how it’s implemented, there are managed solutions out there and it can be self-built entirely.
How we designed it (probably overkill for most apps)
At Codesphere we decided to build a custom user-activity service from the ground up, storing and processing our own data server side, making it easier to switch analytics stacks later. Currently we connect that with Posthog, where we have all the dashboards to work with the collected data.
Our user activity service is a node application that consists of three parts:
- A smaller client side part, where we have logic to attach context only available in the frontend to our events
- A middle part we call common, mostly for interacting with other stuff in our application’s backend (needed mostly for tracking inside the tool, less relevant for most websites)
- A backend part with an express.js application written in typescript - where we handle stuff like user identification, data processing, data storage and connections to 3rd party services (i.e. posthog, conversion integrations to google etc.)
Minimal serverside tracking example
We have prepared a minimal serverside tracking example in this repository: https://github.com/codesphere-cloud/serverside-tracking-example
It consists of an express.js, html application with code for serverside tracking with Google Analytics. The server looks like this:
const path = require('path');
const fetch = require('cross-fetch');
const express = require('express');
const bodyParser = require('body-parser');
const compression = require('compression');
const {URL} = require("url");

const app = express();
app.use(compression());
app.use(bodyParser.json());
app.use(bodyParser.urlencoded({extended: true}));
app.use(express.static('./public'));
const PORT = process.env.PORT || 3000;

const buildUrl = (url,
                  searchParams) => {
    const u = new URL(url);
    Object.entries(searchParams).forEach(([n, val]) => {
        (val instanceof Array ? val : [val])
            .filter(has)
            .forEach((v) => {
                u.searchParams.append(n, `${v}`);
            });
    });
    return u;
};

app.post('/track',
    async (req, res) => {
        const args = req.body;
        const url = buildUrl('https://www.google-analytics.com/collect', {
            ci: args.utmSource,
            cid: args.id,
            dclid: args.dclid,
            dl: args.url,
            ea: '<add a price for your product>',
            ec: args.event,
            ev: '<add a product id>',
            gclid: args.gclid,
            referrer: args.referrer,
            t: 'event',
            tid: '<Add your Google Tracking Id>',
            ua: args.userAgent,
            uid: '<Add the user id if you have one>',
            uip: context.requestHeaders['x-forwarded-for'],
            v: 1,
        });
        fetch(url.toString()).catch(console.error);
        res.end(200)
    });

(async () => {
        app.listen(PORT, () => {
            console.log(`Server listening on port ${PORT}`);
        });
    }
)();In order to see the events in Google Analytics you will need to add your tracking id in the marked spot.
The second part needed to make this work is a script in the frontend to grab some of the mentioned context, in this case embedded straight into the otherwise empty index.html
<!DOCTYPE html>
<html>
<head>
    <title>SST Example</title>
</head>
<body>
<div class="container">
</div>
<script>

    const fp = () => import('https://openfpcdn.io/fingerprintjs/v3')
        .then(FingerprintJS => FingerprintJS.load()).then(fp => fp.get()).then(r => r.visitorId);
    const forEachProperty = (object, looper) => {
        for (const key in object) {
            looper(key, object[key]);
        }
    };

    const getUrlParams = (url) => {
        const params = {};
        const parser = document.createElement('a');
        parser.href = url;
        const query = parser.search.substring(1);
        const vars = query.split('&');
        for (let i = 0; i < vars.length; i++) {
            const pair = vars[i].split('=');
            params[pair[0]] = decodeURIComponent(pair[1]);
        }
        return params;
    };

    const track = (event, visitor) => fetch('/track', {
        headers: {
            'Accept': 'application/json',
            'Content-Type': 'application/json'
        },
        method: 'POST', body: JSON.stringify({event, ...visitor})
    }).catch(console.log);

    (async () => {
        const visitor = {
            ...getUrlParams(location.href),
            id: fp(),
            referrer: document.referrer,
            url: location.href,
            userAgent: navigator.userAgent
        }
        document.querySelector('.container').innerHTML(JSON.stringify(visitor));
    })();
</script>
</body>
</html>Codesphere is launching on Producthunt soon! You can then clone this repo and host it in our webIDE which can deploy and host for free. https://www.producthunt.com/products/codesphere
Let us know which piece we should go into in more detail!

