Interactive E-Com UI Tutorial: Animated Free Shipping Bar
Learn how to increase your e-commerce conversions with our step-by-step guide to creating an animated free shipping bar in the cart. This interactive UI feature not only enhances user experience, but also nudges users towards larger purchases.
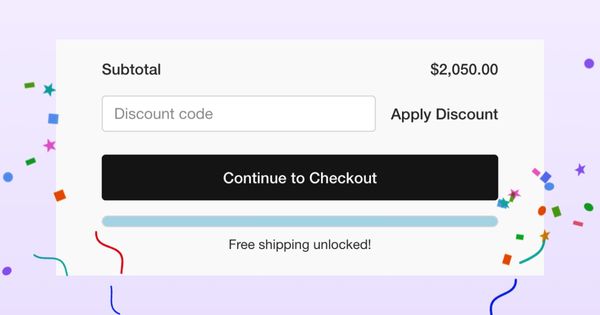

Table of Contents
In this article, the first in our Interactive E-commerce UI series, we aim to create a small animated progress bar using Framer Motion. This progress bar, intended for use in the shopping cart summary, will inform the user about how much more they need to spend to qualify for free shipping, and will celebrate their achievement when they reach this goal by displaying a Lottie animation.
As an e-commerce store owner implementing this, the main aim for our free shipping bar is to increase the average order value (AOV) and encourage users to proceed to checkout.
Setting the scene
In the past few years, animations and microinteractions have grown increasingly popular in web applications. This trend, which initially emerged in native mobile apps, is gradually finding its place in web applications designed for browser display. Despite the rising use of microinteractions, strategic implementation often falls short. Developers often integrate these features for their aesthetic appeal, failing to recognize their potential in guiding user attention and influencing user behavior.
For our animated free shipping bar cart, we're capitalizing on two familiar behavioral patterns:
Unlocking
If there is a possibility to reach something previously inaccessible, people try to gain access to it so that they can benefit from it. This principle can be used to make something more attractive.
Cheering
It is motivating to receive positive feedback already during a task and to see that everything was done correctly.
These patterns form the basis of our design. If we were to test this in a real-world scenario, we could use these patterns to formulate an informed hypothesis about whether the free shipping bar effectively boosts our AOV and reduces the bounce rate from the cart to checkout.
Implementation
To implement this, we'll be working with the standard Shopify Hydrogen Demo Store. Hydrogen is Shopify's React-based headless commerce stack, which supports Framer Motion, a React library for animation and motion.
In our case, we first installed the Shopify Hydrogen Template by following the Documentation. You can obviously skip this step, if youre implementing the free shipping bar into your own store that might be running on a different platform.
Shopify Hydrogen comes with Framer Motion out of the box, if you are implementing this in another system architecture that does not have this, you should start with installing your dependancies first by running:
npm install framer-motion lottie-reactCreating the Free Shipping Bar Component
With the dependencies installed, let's create a new component for our free shipping bar. In this component, we'll use motion from Framer Motion to animate the width of the free shipping bar, and AnimatePresence to manage the presence of the Lottie animation.
First, import the necessary libraries and components. We'll use motion and AnimatePresence from Framer Motion for the free shipping bar animation and the Lottie animation. We also import the Lottie component from the lottie-react package, and a JSON file containing the confetti animation data.
import React from 'react';
import { motion, AnimatePresence } from 'framer-motion';
import Lottie from 'lottie-react';
import ConfettiAnimation from '../../public/assets/7893-confetti-cannons.json'
Next, define the ProgressBar component. It receives a price prop which is used to calculate the progress of the bar and the message displayed above the bar.
The freeShippingThreshold is defined as 1500. This is the threshold that we want our price to reach. Admittedly, this is a very high threshold for free shipping! Since we were using the standard Hydrogen setup, which features a snowboard store with pretty high prices, we adjusted it accordingly for this example. Adjust this value as per your requirements.
The progress is calculated as a percentage of the price compared to the free shipping threshold. If the progress exceeds 100%, we cap it at 100%:
const ProgressBar: React.FC<ProgressBarProps> = ({ price }) => {
  // Define the threshold for free shipping
  const freeShippingThreshold = 1500;

  // Calculate the progress as a percentage
  let progress = (price / freeShippingThreshold) * 100;

  // Ensure the progress doesn't exceed 100%
  if (progress > 100) {
    progress = 100;
  }
Next, we calculate the remaining amount needed for free shipping and define the message that will be displayed above the free shipping bar:
  // Calculate the remaining amount for free shipping
  const remaining = freeShippingThreshold - price;

  // Determine the message to display above the free shipping bar
  const message = progress === 100
    ? 'Free shipping unlocked!'
    : `You're missing $${remaining.toFixed(2)} for free shipping`;
Finally, we return the TSX for our component. We use the motion.div component to create an animated div that changes its width and background color based on the progress. We also use AnimatePresence to conditionally render the Lottie animation when the progress reaches 100%.
  return (
    <div className="overflow-hidden bg-transparent">
      {/* Display the progress bar */}
      <div className="overflow-hidden h-3 w-full border border-gray-300 rounded-md">
        <motion.div
          className="h-full rounded-md"
          animate={{
            width: `${progress}%`,
            // Change the background colorcolor based on the progress
            backgroundColor: progress === 100 ? 'lightblue' : 'lightgrey'
          }}
          transition={{ duration: 0.5, ease: "easeOut" }}
        />
      </div>

      {/* Display the message */}
      <p className='mb-2 text-center text-sm mt-2'>{message}</p>

      {/* Display the Lottie animation when progress is 100% */}
      <AnimatePresence>
        {progress === 100 && (
          <Lottie className="absolute bottom-0 left-0 pointer-events-none" animationData={ConfettiAnimation} loop={false} autoplay />
        )}
      </AnimatePresence>
    </div>
  );
};

export default ProgressBar;
To sum up, In the returned TSX, we create a container div with a free shipping bar and a message. The bar is a motion.div whose width and background color are animated based on the progress value. The message is a paragraph that displays the message variable we defined earlier.
We also use the AnimatePresence component to conditionally render a Lottie animation when the progress reaches 100%. This animation is an SVG animation that plays once and does not loop. It is positioned at the bottom left of the screen and does not interfere with pointer events thanks to the pointer-events-none class.
This leaves us with this code for our Free Shipping Bar component:
import React from 'react';
import { motion, AnimatePresence } from 'framer-motion';
import Lottie from 'lottie-react';
import ConfettiAnimation from '../../public/assets/7893-confetti-cannons.json'

interface ProgressBarProps {
  price: number;
}

const ProgressBar: React.FC<ProgressBarProps> = ({ price }) => {
  // Define the threshold for free shipping
  const freeShippingThreshold = 1500;

  // Calculate the progress as a percentage
  let progress = (price / freeShippingThreshold) * 100;

  // Ensure the progress doesn't exceed 100%
  if (progress > 100) {
    progress = 100;
  }

  // Calculate the remaining amount for free shipping
  const remaining = freeShippingThreshold - price;

  // Determine the message to display above the progress bar
  const message = progress === 100
    ? 'Free shipping unlocked!'
    : `You're missing $${remaining.toFixed(2)} for free shipping`;

  return (
    <div className="overflow-hidden bg-transparent">
      {/* Display the message */}
      <div className="overflow-hidden h-3 w-full border border-gray-300 rounded-md">
        <motion.div
          className="h-full rounded-md"
          animate={{
            width: `${progress}%`,
            // Change the background color based on the progress
            backgroundColor: progress === 100 ? 'lightblue' : 'lightgrey'
          }}
          transition={{ duration: 0.5, ease: "easeOut" }}
        />
      </div>
      <p className='mb-2 text-center text-sm mt-2'>{message}</p>
      {/* Display the Lottie animation when progress is 100% */}
      <AnimatePresence>
        {progress === 100 && (
          <Lottie className="absolute bottom-0 left-0 pointer-events-none" animationData={ConfettiAnimation} loop={false} autoplay />
        )}
      </AnimatePresence>
    </div>
  );
};

export default ProgressBar;
The shipping bar component can now be used as a component simply by importing it into the desired file and placing it where you'd like it to appear. In our case it's in the CartSummary function of the Cart.tsx file under the summary elements. We then pass in the total amount currently in the cart to render the free shipping bar accordingly.
function CartSummary({
  cost,
  layout,
  children = null,
}: {
  children?: React.ReactNode;
  cost: CartCost;
  layout: Layouts;
}) {
  const summary = {
    drawer: 'grid gap-4 p-6 border-t md:px-12',
    page: 'sticky top-nav grid gap-6 p-4 md:px-6 md:translate-y-4 bg-primary/5 rounded w-full',
  };

  // Retrieve the `totalAmount` from the `cost` object, convert it to a floating-point number,
  // and assign it to `totalAmount`. If `cost`, `totalAmount`, or `amount` is not defined, default to 0.
  const totalAmount = parseFloat(cost?.totalAmount?.amount || '0');


  return (
    <section aria-labelledby="summary-heading overflow-hidden" className={summary[layout]}>
      <h2 id="summary-heading" className="sr-only">
        Order summary
      </h2>
      <dl className="grid">
        <div className="flex items-center justify-between font-medium">
          <Text as="dt">Subtotal</Text>
          <Text as="dd" data-test="subtotal">
            {cost?.subtotalAmount?.amount ? (
              <Money data={cost?.subtotalAmount} />
            ) : (
              '-'
            )}
          </Text>
        </div>
      </dl>
      {children}
        <div>
        <ProgressBar price={totalAmount} /> {/* Use the ProgressBar component here */}
      </div>
    </section>
  );
}
Wrapping Up
In conclusion, an animated free shipping bar cart, designed with principles of unlocking and cheering, can greatly enhance user experience in e-commerce stores. Not only does it provide a visually engaging element, it also subtly influences customer behavior, guiding them towards actions beneficial to the store, such as increasing average order value and decreasing bounce rates.
By utilizing technologies like Shopify's Hydrogen, Framer Motion for animations, and the lottie-react package for celebratory effects, we're able to create an attractive, responsive, and interactive UI that appeals to modern customers. Remember, while our example used a specific stack and setup, these principles can be adapted to your unique e-commerce platform.
Stay tuned for more articles in our Interactive E-commerce UI series, where we'll continue exploring exciting ways to enrich your digital storefront's user experience!
